
This piggy-backs off a previous post of mine, The Automation Workflow. In this read we will be running through the creation of a very simple use case for Power Apps: Intake. Let’s Get Automating!
Getting Data from SharePoint, you have two options. Create button within SharePoint of starting from a blank Canvas App. I found the first option is pretty satisfying as it will build out the bare-bones structure. Pick your poison.


If you started from blank then you’ve got a bit of work to do, but in basic steps:
- Connect to your data Source
- Create your Screens (For me I have A browse requests, details, and new request submission.
- Add fields to the screens.
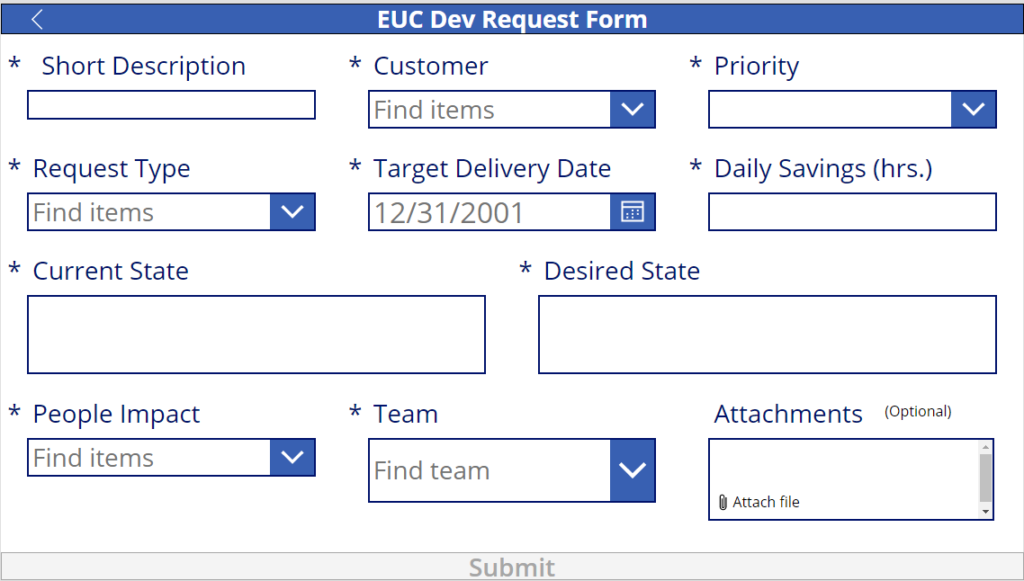
I wont go into the details here as their are plenty of guides to explain Power Apps Basics. Shane Young is a fantastic resource! Lets take a look at a few items. You’ll have to forgive the simplicity of the app and bleeding eye syndrome that follows but lets just say functionality over form. Here’s what I have:
First lets talk about the submit button. With the OnSelect property selected we construct the following using PATCH function. This gets our new record sent over to SharePoint and and handles complex request a bit bitter than if we use the SUBMIT function. I also want to call out we are concatenating current workflow and desired workflow, so take a look at that bad boy if you need to combine any fields into one as it gets created in SharePoint. Remove the /* below.
//Patch Standard Fields
Set(lastrecord, Patch('Development Requests',Defaults('Development Requests'),
{'Short Description':txtShortDescription.Text,
Priority:txtPriority.Selected,
Team:txtTeam.Selected,
Description:Concatenate("CurrentWorkflow:","
/*",txtCurrent.Text,Char(10),Char(10),"DesiredWorkflow:"," ",txtDesired.Text),
'Date Submitted':Today(),
'People Impact': txtPeopleImpact.Selected,
'Request Type':txtRequestType.Selected,
'Daily Savings (hrs.)':Value(txtDailySavings.Text),
'Current State':txtCurrent.Text,
'Desired State':txtDesired.Text,
'Target Delivery Date':txtDate.SelectedDate,
Customer:txtCustomer.Selected}));

//Attachments
Set(varAttachmentControl,JSON(Image1.Image,JSONFormat.IncludeBinaryData));
Set(varAttachmentBase64, Mid(varAttachmentControl, Find(",",varAttachmentControl)+1, Len(varAttachmentControl) - Find(",",varAttachmentControl) -1));
SendAttachementtoDevRequestforEUA.Run(lastrecord.ID,Last(AttachmentControl.Attachments).Name,varAttachmentBase64);

//If(IsEmpty(Errors('Development Requests'));
Navigate(Browse);
//Notify(First(Errors('Development Requests')).Message,NotificationType.Error, 3000);
ResetForm(Request);
The only real complicated field on the form has to be Attachments. There are a few ways to accomplish this but again, I like what Shane Young is doing for simplicity. We dont need to create anything to complex and we dont have to use Power Automate. We will use that later for another but I like to try and keep my App and Data Source independent.
I create a 3rd page that the user never gets to see and on it I create an Image and in the Image property I set
Last(AttachmentControl.Attachments).ValueI also create a few labels for visibility and as helpers and give them the following Text value:
- Label 1 = Last(AttachmentControl.Attachments).Value
- Label 2 = Image1.Image
- Label 3 = varAttachmentControl
- Label 4 = lastrecord.ID
All this paves the way for the snippet above with the attachment to convert from base64 to binary and path it over to SharePoint.
Another concept I am utilizing is with the Est Savings field. I want it to autofill if my end-user selected Visualization as the type of request. So I set the Default value
If(
txtRequestType.Selected.Value="Visualization",
"8"
)
Back to the last piece of the submit button. I wanted to talk about the options we have available for error handling.
//If(IsEmpty(Errors('Development Requests'));
Navigate(Browse);
//Notify(First(Errors('Development Requests')).Message,NotificationType.Error, 3000);
ResetForm(Request);
I’ve experimented around with this a bit, but in the end I’ve commented them out. The first would be setting a conditional to Navigate back to the gallery and reset the form if there are no errors. The reason I decided against this is because I am setting this property on the buttons DisplayMode. This presents the button from being clicked if they user has missed any fields.
If(Request.Valid,DisplayMode.Edit,Disabled)You can also choose to go the Notify Function route but this is more obtrusive to users. Whatever you do keep in mind there is an OnSuccess Property and you need to use that to your advantage to unwanted next actions if their are errors. You can probably find a happy medium with a bit of trial and error.
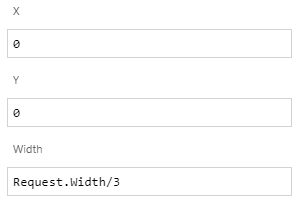
In closing, I wanted to chat about some form layout tips and tricks. I really struggled in moving cards around trying to get the fields in the right place and in the right order. Well, never fear. First decide how many columns you want e.g., in the following example I have 3

Select the DATA CARD and locate the area with X,Y, and Width. First again, decide the number of columns. Set the Width to Request.Width/(number of fields you want in the row). Then set the position of the card. Y is your row number, and X is your column. Adjusting these fields will easily move the cards around.
OK, so this isn’t exactly rocket science, but practice makes perfect and it’s all about exposure. If you are following this read I owe you couple more part to this series. We can still do more with the solution. We can gain insight with business intelligence and we automate some workflows and business process needs with Power Automate.